
To photograph a shed antler for sale, put it on a clean, contrasting background in soft, even light and show the entire shed first. Add photographs of the reverse side, burr, tine tips, measurements and all known damage. Record species, quantity, dimensions, weight, condition and delivery terms. Accurate photos help buyers assess the actual item—not just how impressive it looks.
01 / Set Up a Simple Antler Photography Area
You don't need an expensive camera or a studio. A phone, a stable table, a plain background, and open-shade or window light will often do the job. Choose a background that contrasts with your antler: a pale shed can disappear against white, while a dark-brown shed may be hard to see against dark wood.
Photograph outdoors under a roof or in open shade, beside a bright window, or in a workshop with diffused lighting. Avoid harsh reflections, direct flash, distracting tools and shadows covering the burr. Keep the camera lens clean and focus on the antler. General product-photo guidance from eBay and Etsy also emphasizes clear, well-lit views and honest item details.
02 / Seven Photos Every Seller Should Prepare
These are seven useful views to prepare, not a claim about how many images the marketplace currently permits. If you can upload fewer, prioritize the complete antler, reverse side, burr, damage and a scale reference. For a matched pair or bulk lot, adapt the final view so it shows everything included in the sale.
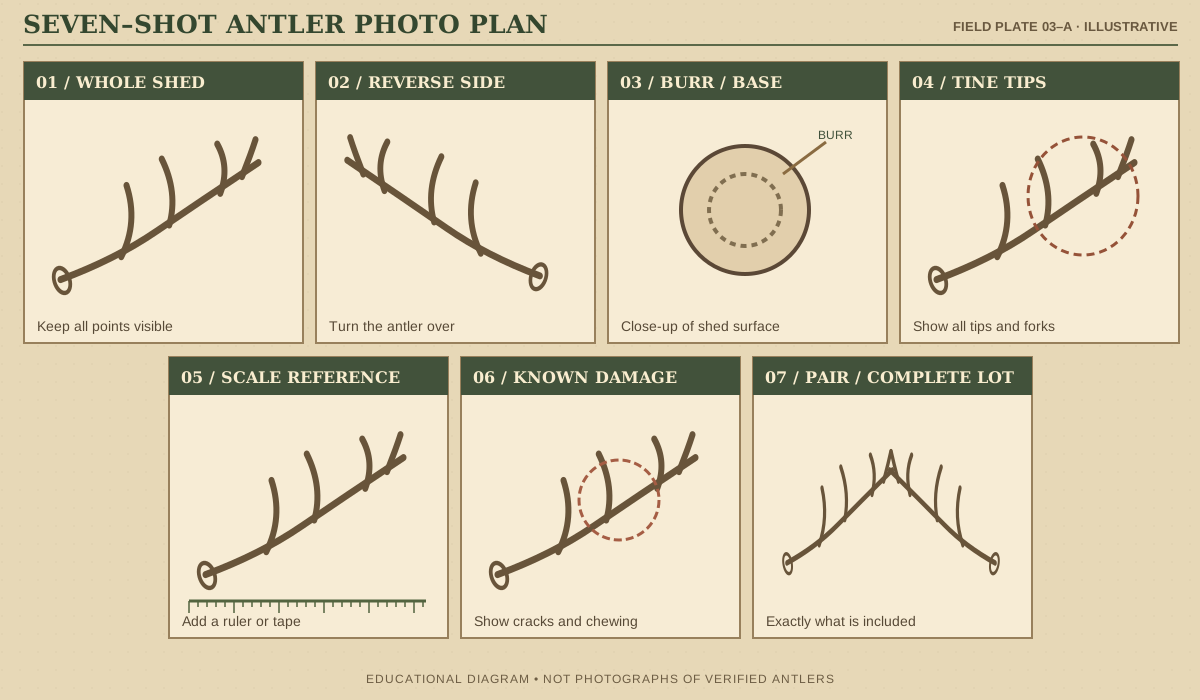
Fit the complete antler, all points and the burr inside the frame. Leave breathing room around the edges so nothing is cut off in a thumbnail.
Turn the antler over. The side that rested on the ground may show very different color, fading or damage.
Show the burr and natural shedding surface in focus. A close-up helps buyers evaluate the base instead of relying on a distant view.
Photograph the points, forks and tips. Add closer views of any broken or unusual tines.
Include a familiar scale object and photograph significant measurements. Curved main-beam length and straight-line dimensions are different, so label each clearly.
Document chewing, cracks, chips, repairs, heavy weathering or stains openly instead of hiding them in shadows.
Show the exact number of antlers included. For matched pairs, photograph the two together and individually. For bulk lots, add a count, total weight and condition overview.
Cropping, straightening and modest exposure adjustments are helpful. Don't digitally remove flaws, alter apparent grade, exaggerate size, or use AI-generated specimens as photographs of an actual product. Disclose staining, repairs or refinishing.
03 / Show Brown, Hard-White and Chalk Condition Accurately
Antler buyers care about both color and structural condition. A brown shed may be relatively fresh, a hard-white shed may have faded but remain sound, and a chalky shed may have substantial cracks or surface deterioration. These are descriptive categories—not universal industry grades. Some buyers prioritize cracks more heavily than color.
Photograph both the top and underside in consistent light; one face may be sun-bleached while the other retains color. Use close-ups to show cracking, exposed material, chewing or repaired areas. For more detail, see Antler Grades Explained.
04 / Singles, Matched Sets and Bulk Lots
| Listing type | Photograph | Record |
|---|---|---|
| Single shed | Both sides, burr, tips, measurements, any damage | Side if known, point count, weight, condition |
| Matched pair | Both together, then separately | Left/right measurements and whether the match is confirmed |
| Bulk lot | Every piece in one image, representative defects | Number of pieces, total weight, grade mix and species |
Do not photograph antlers that aren't included unless clearly identified as props or excluded items. If two sheds resemble a match but you can't verify they came from the same animal, call them a possible matched pair rather than a confirmed one.
05 / Measure Before You Make the Listing
Write down species, number of sheds, known side, point count, weight, condition and useful dimensions. For deer and elk, a curved main-beam length may help collectors compare antlers; overall length, width and height help determine packaging size. These are not the same measurements. Note cracks or broken tips separately from any score you estimate.
Single brown elk shed — right side
Six countable points • 39¼-inch curved beam • 4.4 pounds • minor wear on one tip.
Fictional example values, not an item for sale or an official antler grade or trophy score.See How to Measure and Score Antlers for technical diagrams and a detailed measurement worksheet.
06 / Write a Specific Listing Title and Description
A strong title puts the item's identity first: species + shed type + condition or feature + measurement. Avoid vague language such as “huge antlers” or repeated keywords. Don't include a grade, score, point count or measurement unless you've checked it.
“Big Elk Antlers Amazing Deal”
“Brown Elk Shed Antler — Single Right Side, 6 Points, 39¼-in Beam”
The description should explain exactly what's included, how you measured the shed, what shape it's in, where damage is visible in the photographs and what pickup or shipping arrangements are available. Buyers should not have to guess whether they're getting a single antler, a pair, or a whole lot.
Brown Elk Shed Antler — Single Right Side, 6 Points
One naturally shed elk antler, right side, with brown coloration and minor wear at a tine tip. The curved main beam measures 39¼ inches and the shed weighs 4.4 pounds. Photos show the full antler, reverse side, burr, tips, a scale reference and the worn point. This listing is for one antler only, not a matched pair.
Delivery: Shipping may be arranged; cost confirmed with buyer before purchase.
Fictional demonstration—not a real listing, verified grade or completed sale.07 / Set the Asking Price and Plan Shipping
Compare the same species and a similar condition, weight, sale format and size. A weathered deer single is not comparable to an exceptional brown elk matched pair. Dealer purchase rates, active asking prices and confirmed sale prices are different kinds of evidence. Our shed-antler pricing guide explains how to evaluate them.
Before promising a delivered price, estimate the fully packed antler dimensions, weight, protective materials, carrier cost and any insurance. Extra-long tines and large moose antlers may need custom protection. Continue with How to Ship Antlers Safely.
08 / Create Your Listing on AntlerSheds.com
According to AntlerSheds' public How It Works page, sellers create an account, add antler information and clear photographs, manage listings and communicate with buyers. The public seller page emphasizes taking a picture and setting a price. Logged-in form steps may change; follow the fields actually displayed on the website.
- Prepare. Gather clear photos, verified measurements, condition notes and delivery details.
- Start. Open the seller page and sign in or register if prompted.
- Choose your category. Identify the species before selecting elk, whitetail, mule deer, moose or another category.
- Upload and describe. Lead with the complete antler and add supporting photos, correct quantity and known defects.
- Review before submitting. Confirm the title, item, price, condition and shipping terms.
- Maintain your listing. Answer buyer questions and update or remove the listing after a sale or change.
Wildlife-part possession, collection, sale and shipping laws vary by species and location. Antlers attached to a skull can be regulated differently from naturally shed antlers. Confirm current rules where collected and where sold; this article isn't legal advice.
09 / Build a Listing From Your Own Details
Use this optional browser worksheet to assemble a title and description. It doesn't assign grades, calculate official scores, publish a listing or send information to AntlerSheds. Leave unknown fields blank and proofread the result.
10 / Seller's Pre-Listing Checklist
Check each item before submitting. These checkmarks work only on this page; they aren't stored or transmitted.
11 / Mistakes That Can Weaken a Listing
Missing points in the photo: Step back until the full rack fits. Hidden cracks: show each defect close up. Artificially darkened color: keep colors accurate. Vague quantity: specify whether it's one shed, a pair or the entire lot. Guesswork: don't label an estimate as an official score or assume a pair matches without evidence. Shipping surprises: measure the finished package rather than the shed alone.
12 / Frequently Asked Questions
Can I use a phone to photograph antlers?
Yes. Good lighting, steady framing, focus and a plain background usually matter more than expensive camera equipment.
How many pictures should I take?
Prepare the seven views described above. Confirm the current upload limit on the marketplace, and prioritize the complete shed, base, defects and measurement references.
Should I clean antlers before taking pictures?
Remove distracting loose dust around the item, but don't bleach, stain, grind or heavily alter an antler just to improve the listing. Disclose treatments and repairs.
Should the main photo contain a ruler?
The main photo usually works best showing the whole item clearly. Use another photograph with a ruler for scale and put precise measurements in the description.
What do I do if my antler has cracks or chewing?
Show those defects in close-up and describe them accurately. Hiding significant defects can mislead a buyer.
How should I photograph bulk antlers?
Show the entire lot, count the pieces, record total weight and include close-up examples representing the range of conditions—including damaged pieces.
What if I don't know the species?
Start with our identification guide. If still uncertain, say so instead of confidently labeling the wrong species.
Sources & Editorial Notes
- eBay Seller Center — Take Great Photos: lighting, clear backgrounds and useful detail views.
- Etsy Seller Handbook — Anatomy of a Well-Crafted Listing: accurate photos, titles and descriptions.
- Google Search Central — Image SEO Best Practices: images in context and descriptive alt text.
- AntlerSheds.com — How It Works: public seller workflow.
- AntlerSheds.com — Sell Your Antlers Today: marketplace listing entry point.
Method: This page adapts general product-listing guidance to shed antlers. The seven-shot field plate is an original educational diagram, not seven photographs of a verified specimen. Illustrative listing examples are fictional. Public marketplace information was checked November 20, 2026; authenticated form steps may change.
LEGAL FIELD REFERENCE: Before creating a listing, check the rules for the antler's origin and proposed sale. See Is It Legal to Sell Shed Antlers? for state examples and a documentation checklist.